Wednesday, January 1, 2014
Making the Move to Wordpress
A few months ago, I took a long, hard look at this blog and realized I wasn't doing as much with it and I wanted to try something different. I set up a Wordpress account, created a blog, and I have worked to start something new there. I'm doing things a little differently--the format has changed a bit and I'm going for a "cooking without measurements" theme, but the blog will still include the same kinds of great recipes that I shared here on Reading, Writing, and Ravioli. I've moved all of the recipes posts from here to the new blog, so there's no need to worry about losing any, and I'm adding new things as often as possible. As of right now, I have no plans to continue posting here, but I will continue to keep it up. Please join me at A Pinch & A Dash: Cooking Beyond Measure(ments) to find new recipes! Thank you for your support! Happy New Year!
Monday, July 8, 2013
I'm moving to Memphis!
So, it's been ages since I've posted, and absolutely everything has changed here! I found out in mid May that I'll be moving to Memphis after having been offered a job there (nothing writing or editing related, but a great opportunity at a really cool place—and, hey, there are always opportunities for freelance writing on the side!). Almost immediately after getting this great news, I went on back to back to back trips—first, a visit to see my cousin and her husband and then spend some time with my grandmothers; then a trip to Memphis to visit my boyfriend and find an apartment (took us three days of non stop, all day searching, but I found a great place!); then a mother-daughter trip to Rehoboth Beach. Since then, it's been all shopping and packing and getting schedules figured out (figuring out how soon I could move, when my parents would be around to help, etc.). I finished up at Macy's at the end of June, and while I'll miss my amazing coworkers, I'd be lying if I said I wasn't ecstatic to leave the world of retail. The front room of our house is looking less like a family room and more like a storage unit as I stack up my stuff in there and my bedroom is getting more empty by the day. My parents will be helping me with my move and we'll be loading up a UHaul truck in just a few days, so it's crunch time now. I'm getting a little nervous as my move in date gets closer, but I'm so incredibly excited to be starting this new chapter in my life.
It may seem silly, but one of the things I'm most excited about is the food scene that comes with living in a city (particularly in Memphis, which has a pretty fun restaurant scene and some wonderful food). I'm super close to a really nice Kroger, Whole Foods, and Trader Joe's (a HUGE step up from my quite average local grocery store here in my current town), plus there are a bunch of weekend farmers markets and plenty of restaurants. I've been stocking up on kitchen stuff and I'm already worried about how to fit it all in the kitchen of a one bedroom apartment (I'm already planning on putting a shelving unit in the dining room area to help store everything), but I am so excited to cook in my new place. I work wonderful hours and get off of work earlier in the afternoon, so I look forward to cooking more often, especially now that I'll have a set schedule (having an ever-changing schedule made cooking on a regular basis incredibly difficult here). John is also completely on board with my cooking plans and I'm looking forward to trying out my recipes on him (thought my dad is quite sad that I won't be home to cook for him anymore). Now that I'll be on a regular schedule, in my own space, I'm very eager to cook (and therefore post) more often, so please stay tuned!
It may seem silly, but one of the things I'm most excited about is the food scene that comes with living in a city (particularly in Memphis, which has a pretty fun restaurant scene and some wonderful food). I'm super close to a really nice Kroger, Whole Foods, and Trader Joe's (a HUGE step up from my quite average local grocery store here in my current town), plus there are a bunch of weekend farmers markets and plenty of restaurants. I've been stocking up on kitchen stuff and I'm already worried about how to fit it all in the kitchen of a one bedroom apartment (I'm already planning on putting a shelving unit in the dining room area to help store everything), but I am so excited to cook in my new place. I work wonderful hours and get off of work earlier in the afternoon, so I look forward to cooking more often, especially now that I'll have a set schedule (having an ever-changing schedule made cooking on a regular basis incredibly difficult here). John is also completely on board with my cooking plans and I'm looking forward to trying out my recipes on him (thought my dad is quite sad that I won't be home to cook for him anymore). Now that I'll be on a regular schedule, in my own space, I'm very eager to cook (and therefore post) more often, so please stay tuned!
Thursday, May 16, 2013
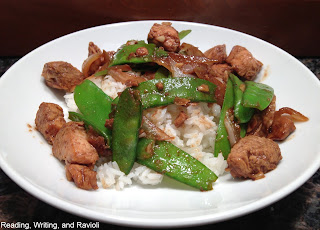
Recipe: Black Bean and Garlic Sauce Chicken with Snow Peas and Rice
I bought a jar of Black Bean and Garlic sauce on a whim during a recent trip to my grocery store. I'd read about it before—it's a mixture of fermented black soy beans and garlic and it's praised as a marinade for beef and chicken in Asian dishes. I figured it would make for a nice alternative to my usual stir fry marinade ingredients and I was totally right—this sauce is the definition of "umami." It's meaty, salty, and savory, and with a little soy sauce, ginger, and sweet mirin, it makes a delicious marinade.
Serves: 4
Prep. time: 10 minutes, marinate for approx. 20-30 min.
Cooking time: Approx. 20 minutes
Difficulty: Easy
Ingredients
For the marinade

Serves: 4
Prep. time: 10 minutes, marinate for approx. 20-30 min.
Cooking time: Approx. 20 minutes
Difficulty: Easy
Ingredients
For the marinade
- 2 chicken breasts, cut into small slices or cubes
- 3 tsp. Black Bean and/with Garlic sauce (can be found in the Asian section at your local grocery store—I used Kikkoman brand)
- 2 tbsp. low sodium soy sauce
- 2 tsp. mirin (Sherry will work in a pinch)
- 1/2 tsp. rice vinegar
- 1/2 tsp. dry ground ginger (or grate a little fresh ginger into the mix)
- 2 cloves garlic, minced
For the meal
- 2 small white or yellow onions, cut into large chunks (quarter the onions and pull apart the layers)
- Approx. 2 cups snow peas, cleaned
- 1-2 cups white rice
- Sesame oil
- Peanut oil
Directions
Combine the ingredients for the marinade in a medium bowl, add the chicken, and toss to combine. Set aside in the fridge and let marinate for 20-30 minutes. Prepare a pot for the rice and cook (I use store brand rice, make two servings, and it takes approx. 20 minutes to cook). While the rice is cooking, heat a splash of sesame oil and a splash of peanut oil in a large (deep) pan or wok over medium high heat. Add the chicken, including the marinade, and cook until partially cooked through, then add the onions and snow peas. Continue to cook over medium heat until the chicken is cooked through. Turn of the heat and serve the chicken and veggie mixture atop the finished rice.
This is a great variation on stir fry, and the black bean and garlic sauce is packed with flavor. Because the marinade only has a few ingredients, it's quick and easy to pull together, which makes this a great meal for a weeknight meal.
Saturday, May 11, 2013
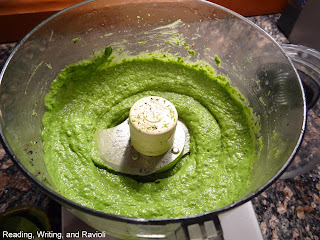
Recipe: Linguine with a Creamy Avocado-and-Spinach Sauce
I'm one of those people who just randomly gets hooked on certain foods. A month ago, it was Eggo waffles. A few weeks ago, it was hard boiled eggs (but only if they were freshly boiled and still warm). The past week, it's been almonds and those little tiny chocolate liquor bottles with real liquor inside (random, I know). Another thing I've been eating a lot of lately is avocado—avocados are rich and creamy with a delicate flavor and I've been eating them like it's my job. So, when I found a pasta recipe that involved using avocados to make a creamy sauce, I was all over it.


Serves: 4-6
Prep. time: 10-15 minutes
Cooking time: 15-20 minutes
Difficulty: Easy
Special equipment: Food processor
Ingredients


Serves: 4-6
Prep. time: 10-15 minutes
Cooking time: 15-20 minutes
Difficulty: Easy
Special equipment: Food processor
Ingredients
- 1 box (16 oz.) linguine or other long pasta
- 1/2 reserved pasta water, as needed (to thin the sauce)
- 1 ripe avocado, pitted
- Juice of 1 lime
- Zest of 1 lime
- 2 garlic cloves
- 1/4 jalapeno
- 1/4 cup packed basil (approx. 2 packages of pre-packed basil)
- 1 cup packed baby spinach
- 2 tbsp. extra virgin olive oil
- Salt and pepper, to taste
- Grated Italian cheeses, to taste
Directions
Bring a large pot of salted water to a boil over high heat. Add the pasta and cook according to package instructions (approx. 9-11 minutes; remember to save some of the pasta water after the pasta has cooked). While the pasta is cooking, add the avocado, lime juice and zest, garlic, jalapeno, basil, spinach, olive oil, and salt and pepper to a food processor and pulse to blend, until smooth. Add a little pasta water, if needed, to slightly thin out the sauce. When the pasta is finished cooking, drain it and return it to the pot, then add the sauce and toss to combine. Serve topped with grated Italian cheese, as desired.
When my dad tasted this sauce, his response was "Ooo! It's like guacamole. Kinda." Yeah. It kind of is, Dad. This sauce is creamy and fresh-tasting, with a little kick of heat from the jalapeno, and you could probably just as easily pour it on a taco or blend it into salsa to create an all new dish. And, really, besides being delicious, it's pretty healthy too. Avocados are fatty, but they're a good fat, and you get a solid serving of veggies with the spinach and basil added in too. Add chicken, shrimp, or even bacon to add a little more protein to this dish.
Recipe: Cheesy Orzo with Cherry Tomatoes and Basil
As I've said in some of my past few posts, I've been trying hard to work on planning meals in advance for the week rather than picking recipes throughout the week and shopping along the way. I've already pretty much mastered the art of "Chopped: Refrigerator Edition," or that ability to take random ingredients from the fridge and pull them together to make a meal (like a less intense version of the show, Chopped, where contestants are given a basket of ridiculously mismatched ingredients and asked to make meals). Between work and looking for work (did I mention I'm planning to move to Memphis by the end of the summer?) this week, I only had time to try out two new recipes (and though I planned and shopped accordingly, I still failed at groceries because I went shopping while hungry...Hello, frozen soft pretzels and Ben&Jerry's S'Mores!). Anywho, this orzo recipe was the first I made and I was quite happy with the results. Cheesy and comforting, this dish is a lot like if mac&cheese and rice pilaf had a baby—orzo (a type of pasta that looks an awful lot like big pieces of rice), grated Italian cheeses, fresh basil, and tart cherry tomatoes mix together to create a comforting and delicious side dish (add chicken or even shrimp for a complete meal).

Yields: 4 servings
Prep. time: 5 minutes
Cooking time: 20-30 minutes
Difficulty: Easy
Ingredients

Yields: 4 servings
Prep. time: 5 minutes
Cooking time: 20-30 minutes
Difficulty: Easy
Ingredients
- 3 tbsp. unsalted butter
- 1&1/2 cup orzo
- 3 cups low sodium chicken stock
- 1 cup cherry tomatoes, halved
- 2 cloves garlic, minced
- 1/2 cup Parmesan cheese, grated or shredded
- 1/2 cup Pecorino-Romano cheese, grated or shredded
- 10-15 leaves (large handful; approx. 2 packages of pre-packed) basil, chiffonade cut
- Butter and olive oil, as needed
- Salt and pepper
Directions
Melt the butter in a medium pot over medium high heat. Add the uncooked orzo and saute in the butter until lightly golden brown, then add the chicken stock. Briefly bring to a boil, then reduce to a simmer and cook for 20-30 minutes, until little or no stock is remaining (drain excess stock if necessary; orzo should be al dente/tender yet firm when done). During the last 5-10 minutes the orzo is cooking, add a little butter and olive oil to a small pan over medium heat, then add the tomatoes and cook until their skins start to split a bit (they should be a little soft). When the orzo is done, add the cooked tomatoes, garlic, basil, cheeses, and salt and pepper and gently stir to combine. Serve as a side (top it with chicken or shrimp for a nice meal), or make into a hearty and comforting meal by adding chunks of sauteed chicken to the finished orzo. Or, if you're me, just eat it as is! Who says it can't be a meal in and of itself?
This dish is simple, quick to make, and quite tasty. The cheeses melt into the orzo, making the dish creamy and rich. Fresh basil and cherry tomatoes add a pop of flavor to balance out the creaminess of the cheese. Cooking the orzo in chicken stock rather than water adds great flavor to the dish. This is a perfect side dish, but it can be made into a main meal with the addition of some sort of protein (chicken, shrimp) or simply serve it as is for a comfort dish.
Sunday, April 28, 2013
Recipe: Quick and Easy Microwaveable Brownie for One
Sometimes you want a brownie, and you want it NOW. You want it chocolaty, hot, and hopefully topped with a scoop of ice cream or paired with an ice cold glass of milk. This desire for a brownie hit me not once, but twice, a few weeks ago (it had been a loooooong week), and I went on a mad online search for a decent recipe for microwave brownies (because waiting for a batch to bake in the oven was so not happening). I found one on Food.com that looked pretty good—I know that a brownie made in a cup and thrown in the microwave can't possibly compare to a batch properly cooked in the oven, but it's really nice to have the option to make a quick brownie when you want one. This recipe results in a fluffy yet gooey brownie rather than a dense and chewy brownie or cake brownie, and it just makes a single serving. You can make it in a mug, but I made mine in a small, microwaveable mixing bowl. I added a few drops each of peppermint and spearmint extract to make a minty brownie and topped mine with mint chocolate chip ice cream, but I've just listed the main, plain recipe here.
Serves: 1
Prep. time: 5 minutes
Cooking time: 1-1&1/2 minutes
Difficulty: Easy
Ingredients
 |
| When I said I wanted it NOW, I meant it. There was no time to take a proper picture. NO TIME! |
Serves: 1
Prep. time: 5 minutes
Cooking time: 1-1&1/2 minutes
Difficulty: Easy
Ingredients
- 2 tbsp. unsalted butter, melted
- 2 tbsp. water
- 1/4 tsp. pure vanilla extract
- 1 dash (approx. 1/8 to 1/4 tsp.) salt
- 4 tbsp. granulated sugar
- 2 tbsp. unsweetened cocoa powder (I just used Hershey's, but the better quality you use, the better the flavor)
- 4 tbsp. all-purpose flour
Directions
Melt the butter in a mug or small, deep bowl, in the microwave. Add the water and vanilla to the mug/bowl and whisk to blend. Add the sugar and salt and whisk to blend. Add the cocoa powder and flour and whisk to blend. The final mixture should be well blended, with no lumps (there may be some graininess because of the sugar). "Bake" in the microwave for 1-1&1/2 minutes, but no longer (too long and it'll get burnt and dried out; a minute and 15 seconds is just about right). The brownie should be soft and slightly gooey in the middle (unless you cooked it a bit longer); it will also be very hot, so be careful. Let it sit for a minute or two before eating. Best served with a scoop of ice cream, a dollop of whipped cream, or a glass of milk.
Simple and tasty—that about sums it up. It's not a dense brownie square like you'd get from a proper batch of oven-baked brownies, but it's chocolaty, gooey, ready in a minute, and you can eat it with a spoon, so it's pretty damn delicious nonetheless.
Thursday, April 25, 2013
Recipe: Jalapeno, Bacon, and Chicken Pasta with a White Cheddar Sauce
Last week, I planned out my meals for the week, buying all of my groceries in one go at the beginning of the week and assigning different meals to each day. My plan got a little kink in it at the end of the week when I didn't end up making the jalapeno-and-cream cheese stuffed chicken I had planned on making and instead used the cream cheese in my lemon and raspberry cheesecake. I also had green onions stashed in the veggie drawer that I had bought for a tuna dish I thought I would be making but couldn't (due to the fact that my crappy local grocery store never has tuna; I grabbed the green onions before making my way to the fish counter and finding out they hadn't gotten any tuna in for the day). So, I had jalapenos and green onions to use, plus the cheddar cheese that was called for in the jalapeno-and-cream cheese chicken recipe, plus half of a red onion from another dish I made, plus some heavy cream. I went through my quite common "What can I make with this assortment of ingredients?" routine and settled on making a spicy, cheesy pasta dish with chicken and a little bacon, for good measure. The resulting meal was quite tasty—tender chicken and pasta tossed with crispy bacon, lightly cooked green onion and red onion, jalapenos (minus the seeds, to help cut back on the spiciness), and a light and creamy white cheddar sauce.


Serves: 4
Prep. time: 15 minutes
Cooking time: 30 minutes
Difficulty: Easy
Ingredients
- 8 oz. rotini, or other small/short pasta
- 4 slices bacon
- 2 chicken breasts, cut into cubes and seasoned with salt and pepper
- 1/2 red onion, chopped
- 1 bunch green onions, chopped
- 2 jalapenos, seeds removed, finely chopped*
- 2 cloves garlic, minced
- 1/2-1 cup heavy cream
- Approx. 4 oz. white cheddar cheese, shredded
- Butter, as needed
- Salt and pepper
- Cornstarch-and-water mixture, as needed
*When removing the seeds from the jalapenos, use gloves or whatever is available to cover your fingers so as to avoid getting the seeds and oil on your fingers. The oil in jalapenos is very spicy/hot and stays on your skin for quite some time, even with frequent hand-washing. I made the mistake of not using gloves and I could still feel and taste the jalapeno on my hands after two days. On a related note, if you want more spice in your dish, add in some of the seeds—they're where the real heat is.
Directions
Heat water in a medium-sized pot over high heat. While waiting for the water to boil, heat a large pan over medium-high heat and add the bacon. Cook until crisp, but not overcooked, and remove to a paper towel-covered plate to drain. Leave the bacon grease in the pan and add the chicken, cooking until golden brown and cooked almost all the way through. When the water in the pot is boiling, add the pasta and cook according to package instructions (approx. 10-12 minutes). To the pan with the chicken, add the green onion, red onion, and jalapeno and cook over medium heat until they are tender. Add the garlic, salt, and pepper (and butter, if needed) and reduce the heat to low. Crumble the bacon and add the bits to the veggies and chicken. Meanwhile, in a small saucepan, add the heavy cream and heat slowly over medium high heat. Once simmering, slowly whisk in the cheddar cheese and some salt and pepper. Allow the cheese to melt into the cream. Add some cornstarch-and-water mixture if the sauce seems too thin. Cheddar doesn't always melt very well, so the sauce may not be as smooth as you want, but once mixed with the other ingredients, this isn't noticeable. When the pasta is done, drain it and return it to the pot. Add the chicken and veggie mixture to the pasta and toss to combine. Pour the cheddar sauce over the pasta mixture and toss to combine. Add more salt and pepper, if desired. Serve topped with shredded cheddar cheese.
This dish is a perfect mix of spicy, salty, cheesy, and savory. The cheddar sauce pulls everything together and helps mellow and evenly distribute the heat from the jalapenos. Tender chicken and crispy bacon add a little dose of flavorful protein and the flavors of the green and red onions really kick the dish up a notch.
Subscribe to:
Posts (Atom)